
Attestation should be embedded at the beginning of the project once all sites have been created and the header template exist. This will ensure the Attestation logic is in place from the start, and avoids unnceccesary risk toward the UAT period
Ensure your menus exist on each site where they will be required, and has EXACTLY the same naming convention across all sites
 All posts should have Elementor activated, unless they are only used to house data (eg “Authors” saved as Team-members). The post content is designed in Elementor and then pulled in by the Post Template. If the post has custom post fields those will have to be edited within the WordPress view.
Building Websites:
All sites should be built with Elementor. The widgets and plugin features provided by Kurtosys within DXM will be able to handle all types of builds if Elementor is used. Sharing and translations are functions that integrate seamlessly with the Elementor widgets. If something is not possible to achieve with Elementor please contact Kurtosys before implementing this outside of Elementor.
In this section, we will cover how you should go about creating a new site on an already existing instance. For ease of writing and for example purposes, I will refer to the current site as the Global site and the new site as the UK site. In this article, I am also assuming that the secondary site is already created.
As a note in some areas, I mention Copy, and in others I mention Share. Copying in this case means recreating all of the relevant content and design aspects. For sharing you should be using the Sharing functionality that comes with DXM.
Once the new site is created you will need to set up some basic items. Please consult the DXM Best Practises page for these items. Once they are done you can come back to this article and continue with the remaining items.
Setting up the base of the site:
- To start off please do the following
- Go to the Customize.php page and add in your site Logo and Favicon (site icon)
- Go to your menus area and create the Menus. Please ensure they match the Global site in both the name of the menu and the menu items (unless otherwise indicated by the scope of work)
- Create the mega menus if necessary. This is site-dependent and the look and feel of the mega menu items should match the Global site.
- Once those steps are done you can start with the following
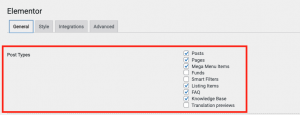
- Copy over all post types and taxonomies
- Copy over all listing items
- Share the pages
The final step before heading going through to sharing the posts is to connect all of the templates to their relevant areas. Due to it being a new instance the templates will have new ID’s so they will have to be reconnected.
I want to add the following as a very important note. The templates on your subsite are connected to the templates on your Global site. If you make any design changes to the shared template it will change it on both sites. To read more about this please go to this article. Should you require a different look to the template then you should copy it and create a new version of it and connect it to the relevant area.
Sharing the Posts within the post types
The next step is sharing all of the relevant posts with your new subsite. You will need to go into each individual post to do this. This is the most time-consuming part of the process but once it is done you will be ready to make any needed adjustments and then have the site reviewed.
Final steps and some notes
Once you are done sharing all of the site’s pages, posts, and other content you can review the site to ensure everything is aligned content-wise. If a page was edited in Elementor and the changes do not show up on the shared sites pages then you might have not pressed update on the WordPress side of things. To read more about this please go to this article. Always ensure that you press the Update button in WordPress once you have done changes on a page. This will then share the page with all of the relevant subsites.
When you have a subsite that needs to use different Segmentation lists for the relevant subsite then you will need to ensure your template conditions are setup correctly.
If, for example, you have a US site that has specific funds with specific configuration settings then you will need to create a specific template for it. If those configuration settings are different on the UK site then you should create a UK specifc template for those funds.
Template Configuration:
- Ensure there are no conditions set to the templates. As a default, you need to select a Post Type when setting up a single template. Before publishing, you should remove this condition.
- Ensure you name the new template according to the subsite it is relevant to.
- Ensure you place the Subsite-specific templates into their own category.
The use of excessive inline CSS will slow down the website. A total of 300 lines of inline CSS is a guideline which will be allowed on the site. Anything more than this will slow the site down too much and should be avoided.
If there are more than 300 lines, put it in a CSS file and upload it to the Media Library. You can then reference the external file using one of the HTML widgets.
If it is necessary for more than 600 lines then please consult with the Kurtosys DXM Product for review as most of the CSS should be covered within Elementor.
The use of custom code are sometimes required to conform to specific requirements, but it shouldn’t be the norm to add Javascript or HTML to a page when an Elementor widget can perform the task.
The designers should keep this in mind when they do designs and they will ensure that you can develop the site using just Elementor and minimal custom code.
If you do need to use custom code please only use the following languages:
- JavaScript
- CSS
- Jquery can be used in certain areas but it should be carefully considered due to deprecation. If it is used, please make sure the latest version is used
 Instructions on where code should be placed:
- CSS should be placed in the CSS area of the Theme styles
- JavaScript should be placed at the top/bottom of the relevant page (depending on when it needs to execute) if it is applicable to one page
- If CSS/Javascript is applicable to multiple pages it should be added into the Header Template of the site using an external file. The Media Library supports JS & CSS files.
- Use of customise.php
Naming Convention
Please ensure you mark each of the custom code areas according to the type and use within the navigator.
Example:
If there is a snippet of JS that controls the tabs it should be named [Custom JS – Page tabs]
In this panel you can setup some of the default styles for your website.
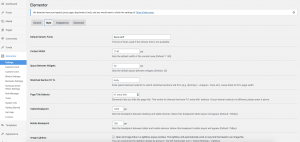 Styles to set up according to the design:
- Content Width
- Space Between Widgets
- Tablet Breakpoint
- Mobile Breakpoint
Ensure you define your global theme style in one area
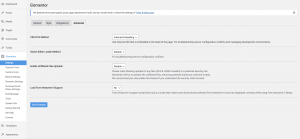 Ensure that the CSS Print Method is set to “Internally embedded” for multisites, even though it is not recommended for Performance reasons. There is an Elementor bug if External is used.